Programming your ACCESS TECH sliding gate opener is a straightforward process that ensures your automatic gate operates safely, smoothly, and tailored to your needs. Whether you’re setting up a new unit, reconfiguring settings, or pairing a new remote, this guide walks you through every essential step—applicable to ACCESS TECH models. With clear instructions and practical tips, you’ll have your sliding gate opener programmed in no time.
1. Pre-Programming Preparation
Before diving into programming, take a few minutes to complete these simple checks to avoid delays or errors:
- Verify Power & Wiring: Ensure the sliding gate opener is connected to a compatible power supply (typically 220V±10% 50Hz input, 24VDC motor voltage) and all wiring (motor terminals, photocells, control board) is securely connected as per the product manual.
- Test Gate Mobility: Manually move the gate to confirm it glides freely without obstacles, jams, or excessive friction. If the gate is stiff, address the issue before programming.
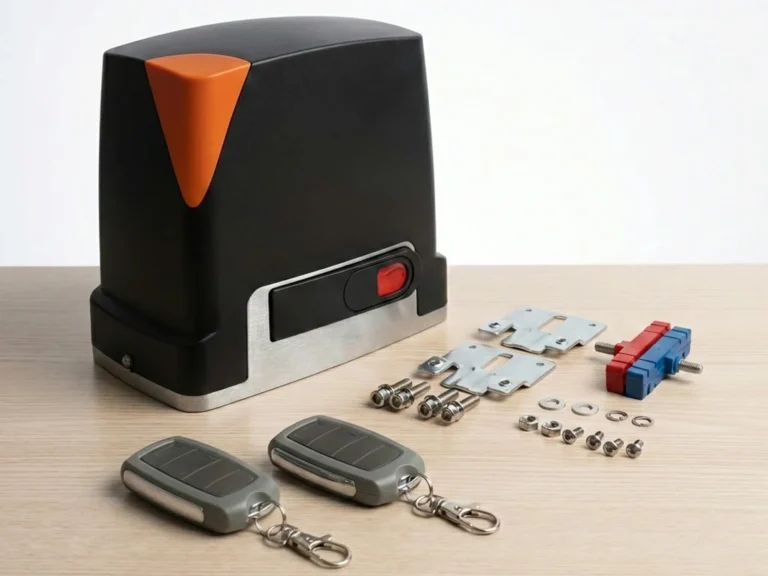
- Prepare Remotes: Install fresh batteries in your transmitter and keep it within 30 meters of the control board—this is the typical remote range for ACCESS TECH gate openers.
- Prioritize Safety: Clear the gate’s path of people, pets, and objects. Keep children and bystanders at a safe distance during programming to prevent accidental activation.
2. Core Programming Steps
2.1 Customize Operational Parameters
ACCESS TECH gate openers let you adjust key settings to match your usage habits. Here’s how to configure them:
- Turn on the gate opener and press and hold the “SET” button for 3 seconds until the LED display lights up.
- Use the “OPEN” or “CLOSE” buttons to scroll through the parameter list (e.g., run time limit, auto-close delay).
- Press “SET” to select a parameter, then use “OPEN” (increase) or “CLOSE” (decrease) to adjust the value.
- Press “SET” again to save your changes. To exit without saving, press the “STOP” button.
Essential Parameters to Adjust:
- P1(Run Time Limit): 0–80 seconds. Set based on how long your gate takes to fully open/close (0 = no time limit).
- P6(Motor Direction): Switch to reverse if the gate moves in the opposite direction of your command (default = positive direction).
- P7(Auto-Close Delay): 0–99 seconds. Choose how long the gate stays open before closing automatically (0 = no auto-close).
- P9(Control Mode): Opt for single-button control (open-stop-close-open cycle) or three-button control (separate open/close/stop buttons).
- P12(Obstacle Sensitivity): Adjust how quickly the gate reverses or stops when it hits an obstacle (range: 0–20).
2.2 Calibrate Running Stroke (Set Open/Close Limits)
Proper stroke calibration ensures the gate stops exactly at your desired open and closed positions:
- Power on the opener and press the “OPEN” button to move the gate to its fully open position.
- Press the “CLOSE” button to guide the gate to its fully closed position.
- The LED display will show “YS” once calibration is complete—your gate now knows its full range of motion.
2.3 Erase Existing Stroke (For Re-Calibration)
If the factory-set stroke doesn’t match your gate’s length, reset it easily:
- Keep the gate stationary and press and hold the “STOP” and “OPEN” buttons at the same time for 3+ seconds.
- Release the buttons when the alarm beeps three times and the LED displays “CLR”—the old stroke settings are erased.
- Follow Section 2.2 to re-calibrate the stroke to your gate’s specific dimensions.
2.4 Pair a Transmitter (Remote Control Setup)
Program your remote to operate the gate opener wirelessly:
- Locate the “LEARN” button on the control board (refer to your manual for its exact location).
- Press the “LEARN” button for 1 second—the “LEARN” LED will light up.
- Within 10 seconds, press and hold any button on your transmitter.
- Release the transmitter button when the “LEARN” LED flashes several times and turns off—your remote is now paired.
2.5 Erase All Transmitter Codes
To remove all paired remotes (e.g., if a remote is lost or stolen):
- Press and hold the “LEARN” button for 8 seconds.
- Release the button when the “LEARN” LED turns off—all previously programmed remote codes are erased.
3. Troubleshooting Common Issues
If you encounter problems during programming, use these quick fixes to resolve them:
- Gate doesn’t respond at all: Check the power supply, replace any blown fuses, or reattach loose wiring connections.
- Remote won’t pair: Ensure the remote is within 30 meters of the control board and has fresh batteries. Repeat the pairing process (Section 2.4) and confirm the “LEARN” LED flashes.
- Stroke calibration fails (no “YS” display): Make sure the gate moves freely without obstacles. Erase the old stroke (Section 2.3) and try calibrating again.
- Motor runs in reverse: Adjust the motor direction parameter via the control board (refer to Section 2.1).
- Error codes (E1–E8, EH):
- E1: Gate runs longer than the set time limit → Increase the run time limit (parameter P1).
- E5: Photocell is triggered → Remove any objects blocking the photocell.
- E3: Motor is stuck → Clear obstacles or adjust the obstacle sensitivity setting.
4. Safety & Best Practices
- Always disconnect power before adjusting wiring or accessing the control board to avoid electric shock.
- Never modify the gate opener’s components—unauthorized changes can cause damage or safety hazards.
- Test safety features (like obstacle detection) after programming: Place an object in the gate’s path to ensure it reverses or stops immediately.
- Store the product manual in a easily accessible place for future reference. For complex repairs or issues, contact professional personnel.
By following these steps, you can program your ACCESS TECH gate opener with confidence, ensuring reliable and safe operation for years to come. If you need further assistance, reach out to ACCESS TECH’s customer support or consult your product manual.